Saturday, July 23, 2011

A little over a year and a half ago I happened into an Otari MX5050 mkIII-8 half inch eight track in as-is condition for a price I couldn't pass up.


It looked like it had taken a bit of a tumble while in storage, so I'm approaching it as if it's inoperable but remain cautiously optimistic.


That'll hammer right out...


I can image people recoiling in horror at the condition. I think some proper wood panels may be in order once electronics and mechanicals prove serviceable.


I am at present awaiting the arrival of tape, by the time it arrives I will have exacted a brute force fix to this take up side idler arm.


The (presumably) original roller was about the consistency of Play-Doh™, and absolutely useless for anything beyond making a mess. I bagged it up and sent it to Terry's Rubber Pinch Rollers and Wheels for rebuilding.


Terry does good work. Here's the returned Otari roller posing with the Tascam 34 roller it travelled with in April of 2010.


Here's the roller installed on the machine fresh out of storage, I will be pulling it and washing it in mild soap and water to eliminate the storage film.. along with a rigorous cleaning of the rest of the deck.


The headstack carries a JRF Magnetics relap sticker. I've seen a thread on gearslutz in which someone is questioning the condition of a similar looking stack, also carrying a JRF sticker. See, the contact edge to tape appears to be a flat as opposed to convex plane, and at first impression it looks like the tape has cut a saddle and the heads are shot.


However, the polished "saddle" extends above and below actual tape path as seen here indicating intentional machine and polish. So with luck I've got a few more hours on the heads.


I expect to pull and recap these channels, once I'm through recapping the mixers (one of which was partially disassembled last night, which is a post for another day). The tape and take up reel that are in transit will arrive prior to electronic work, so I expect I'll get an earful of the electronics here prior to recap. Which, better judgement aside, will factor in to prioritizations..

The logic circuits, front panel switching and transport all appear to be in good condition.


The 3 & 6 input connectors may receive a little of the aforementioned brute force repair as well.

Not striving for minty fresh here, just functionality.

Sunday, July 17, 2011

It was pointed out a while back that most of what I've written about is in fact not machinery. Well, we're going to get closer today.


My 76 Dodge B100 Sportsman has been sitting for roughly 3.5 years, having been limped home after the steering box bracket broke a few blocks from home. That was welded earlier this year, and we reasoned that the weld on one side had failed very early on, and stresses from steering had eventually fatigued the metal of the bracket which broke in two on a tight corner.

That being fixed, it was time to set about resolving a coolant leak which had been plaguing me during the final weeks of its use.


Having pulled and flushed the radiator, which was my initial primary suspect for the leak, I set about removing the air-conditioning (which had vented to atmosphere decades ago) and HVAC plenum to gain a bit of room to work.


Naturally, this involved manipulation of the heater plumbing, which was informative. The preceding two frames being a heater feed hose and the heat control valve respectively.


Of course, my assessment of deterioration was as yet incomplete; while re-routing the heater hose to simply jump from inlet to outlet in the water jacket the water pump port snapped in two.


Erosion is evident.


This bolt is my only recourse short of replacing the water pump, which, considering the status of metal parts in the cooling system may be facing replacement anyway. It will have to be replaced if I ever want heat again.


On the up side, having reassembled the cooling system with just the radiator in circuit it would appear as if the radiator was not the source of the leak, as it's held water now for over a week.

At which point trying to get the engine running again came into play. I had started it sufficiently to drive it across the street for welding, after which driveability took a nose dive. The only way to keep the engine running was to pump the gas pedal, which makes for a less than pleasant drive. I reasoned that it was carburetor rebuild time.


Considering the conditions of the float bowl interior, rebuild necessity was a safe bet.


The metering rods and jets carried enough scale to explain why idle and fixed throttle positions were, well, useless.


Here's a better shot of the rods. All the brass cleaned up nicely.


This cleaned up nicely too, the rust was an extension of the accelerator pump inlet valve ball changing from steel to iron oxide.


I don't have any intermediate photographs, as it soon became apparent that the carburetor cleaner was very aggressive toward plastics and I didn't feel like subjecting the camera to even the slightest trace of that. So you'll have to take my word that it cleaned up nicely.


Reassembled Carter BBD prior to installation on the engine. I poured some gas in the bowl, and it fired right up. Only too happy to idle away and burn off material and seepage that has accrued over the intervening 3.5 years.

If this thing is going to remain running in the long term, I will have to sort out some fuel conversion for it, gasoline is an ailing industry.

Sunday, July 10, 2011

100th post!


Here's the first official [view] release in a while:

http://www.controlvalve.net/

Control_Valve is a good and growing online repository for concise experimental/noise works, and it's pink.

Here's a direct link to the zipped release ctrl_vlv_027 in the event time has passed and I've fallen off the front page: ZIP file download package ...because, naturally, this is all about me.

In other news, I've noticed a lot of traffic revolving around specific mixing console search terms. It occurs to me that a mixer shoot out would be a worthwhile endeavor, but in the same moment it occurs to me that there are practically infinite variables that work against such a collection. The root idea was just A/Bing preamps with something along the lines of an SM-7 hung in front of a tube amp and not moved between takes, at which point the logistics of it begin to take a slide. On the whole, the entire process sounds like a pain in the ass, unless I'm at the point in which I've already got several serviced mixing desks hooked up. This will happen, but it's going to take some time.

Sort of like my languishing ring modulator comparison library project.

Maybe I'm just bitter because my recent parts order has been loaded on a truck for delivery for over 24 hours now and I know I will not receive it until tomorrow at earliest (probably the worst day of the week on the getting stuff done scale).

Saturday, July 09, 2011

It's high time for some shoddy photography. (Apologies, it was clearly not my day for running a camera, though I certainly don't feel like reshooting this as imagery is secondary to the process)


Enter the Ramsa 8210. For years this thing sat on a shelf in a back room at the music store I worked at over a decade ago. Even then it lured me a bit, but for one reason or other never made me reach for my wallet (probably because I already HAD a mixer and was/am perpetually broke).

During the big move it went home with a friend to start a new life.


But it would seem that all was not well in mixer land, the several year lapse in use (I reckon easily a decade) had done damage to the switchery..


Reducing the preferred characteristic of plug and play (most beneficial when dealing with creativity) into a hammer party of exercising the moving parts with varying degrees of success.


Meanwhile, the electronic side of things had also decayed in the rut of disuse..


Which would explain the fact that when I picked this console up as potential trade fodder it wore a VOC odor of ruptured electronics in the same way some people wear perfume. I actually had to roll my windows down on the drive home to tolerate it resting in the passenger seat.


1 out of 3 is not bad. In all likelihood, the capacitors had dried up beyond use during the many years of neglect; application of power just made them fragrant.


In doing some initial investigation regarding this family of mixer I found some pockets of praise, so there's encouragement to fix it beyond my own simmering curiosity. In working on it I am seriously considering ousting the RCA phono type connector for the more instrument friendly 1/4" phone plug.


All rear connectors are contained on a separate circuit board card, making a jack retrofit rather trivial (once the channel strips are removed for recap). Hopefully they can be fitted without interference.

Tuesday, July 05, 2011

Hahahahaha, so, "open the floodgates" apparently means "take a month off". I'm sure future installments will be spotty as well (see what I did there?).

Noticed a mildly acrid/sweet VOC sort of smell faintly emanating from the Roland SMX-880, which has been performing line mixing duties for living room sequencing. It wasn't until I picked up a Ramsa WR 8210 for trade, which positively reeked of this exact smell, that I decided to do something about it.

I've also noticed a recent development of fizzle on some high resonance/low frequency synthesizer decays and an over all squishiness in the low end. Hopefully this is a new development and not just me finally coming around to the facts after being exposed to mixing board odor.


Since I've deemed it unlikely that I'll find service data on this unit, I went about the classic count and scratch method to tally caps (note indelible ink marks on capacitors).


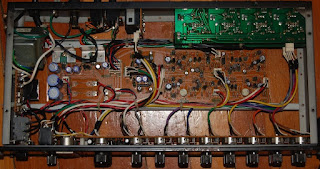
The inputs are simple discrete sections, which I've more or less failed to photograph very well here. Sound quality (even now) is warm and full when compared to the modern lofty frequency response/high slew rate low headroom cookie cutter fare that fills out the ranks of low priced mixers these days. That said, it's not lush and there's a distance grit that overlays everything. I like the sound quality of this unit, though I do hope to tighten up the low frequency and lose some distortion artifacts. I guess time will tell how much of the warm girth is actually out of tolerance parts.


Over all attention to detail, as evidenced by this printed circuit star ground plane, is promising, and I look forward to replacing all the caps, washing the PCB and giving this thing another span of useful life.