0.5 inch.
0.75 inch.
1 inch.
1.25 inch.
Working into space constraints, I really need a 1 inch hole, going over by 84 mils will put me into breaking sidewall territory, so I grabbed the 0.8835 "1/2" incher with the intent of making up the difference with file by hand. To its credit, it did seem to make a bit more progress before failure.
There are a lot of ways to botch a screw, and I've sheared my share of hardware via the mechanical force of the hardware itself; I do not recall seeing something quite this bad.
A little internet sleuthing (admittedly done BEFORE I purchased the tool, so you're all encouraged to laugh heartily AT me) indicates a lot of failure with the small stud, but apparently there's a newer revision that addresses the problem. Hopefully mine is first rev, this level of failure indicates process issue with me.
If you're bored and want to read more about this sort of thing, look up "cast iron railroad bridges".
Brittle metal.
I've given the stud a bit of scrutiny, and cannot find evidence of material having fractured out of the screw. Thread count matches, and I can see where faces would line up. However, the metal is now highly deformed and the gap will not close when lined up, as if it was under heavy preload prior to failure and relaxed into a state that puts a wide void where thread should be.
It's almost as if it's laughing at me.
The panel is getting nicely chewed up at this point.
Side by side, a comparison of losers. Really though, it's pull stud failure on both accounts, so instead of fussing about with further stupidity I'm thinking of visiting my local reputable hardware supplier and seeing what I can get in the way of threaded stock that can support this sort of load.
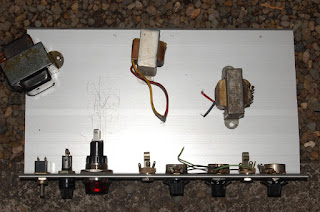
In the mean time, for this one, I just drilled it out as high as I can go with a drill (0.875") and made the rest up with a hand file, as evidenced by the bought of scraping situated inboard of the abnormally large pilot lamp assembly.
Now that the front panel can support a mock up, I'm free to position the iron for plunging the mounting holes and then moving on to tube socket & various. Thankfully, I'm substituting a 6BQ5 for the 6K6, and I can get away with making a hole to accept 9 pin miniature with the drill press. Otherwise, I'd probably be a bit irate about this experience.
Also, FWIW, my snap edge is the one pictured on the left, the uglier cut to right being one conducted in field with a circular saw (by others). Thought it crucial to defend my work since that will all be buried in woodwork anyway. HAH


8 comments:
That fracture doesn't look 100% fresh. It looks like there was a crack existing prior to breaking the screw. This isn't all that uncommon in poorly heat treated screw threads since the V bottom is a stress riser and can cause thermal cracking during quenching. I wouldn't buy anything from Harbor Freight. Best to keep searching eBay for a cheap used punch.
If you want to try to find a bolt to replace the original, if it's an inch size, you need a grade 8 or better. If it's metric, you need to get as strong a bolt as possible. You may find that a standard bolt will work, but you may not be able to use the thrust bearing that came with your set. I'm not certain why your screw was necked down. Often times, the threads are rolled, instead of cut, and that requires a reduced shank. Rolled threads are generally stronger than cut threads.
Agreed, there's a high contrast between the (previously) intact metal that failed and the defect crack which took on oil. I wonder if I could have seen the fault before it was broken, sadly I didn't scrutinize it until after the fact.
A quick eBay search for Greenlee does make me happy. Thanks for the nudge!
The threads are different on each end, the larger thread supporting the driving nut, the smaller thread carrying the punch. I'd probably go grade 8 + and use the older punch set. Were it not for the fact that I'd rather just get a robust one tool per size (inch & 1.125" are the only ones I need)..
You should be able to get by with a cap screw the size that fits in the punch. There might be some point to the two different threads on the stud, but my Greenlees just use a cap screw, admittedly, one with a very big head.
I hate to mention it, but you do have my old Greenlee somewhere in your stuff that is whatever size an octal socket uses. I can't remember, was that a 1 inch? If you have to throw big dough at a tool that will do 1 and 1.25, a hefty step drill bit might be the best route. I wonder if you could set up some rig that would allow you to use an old train jack to drive a punch through your metal stock.
Maybe that Greenlee was smaler. Memory fades...
1 1/8th inch. Yeah, it's still hiding in a box somewhere. Anything over an inch is veering towards too much for this particular project. I think the flange on the pilot lamp assembly would cover 1.125" just fine though.
Post a Comment