Here we have a Lafayette branded Univox U50 Bass hybrid amplifier head. It boasts a three input solid state front end feeding a push-pull 6L6 output with 12AX7 phase inverter. The controls, from left to right are: Volume, Bass, Treble, Hi Boost, Lo Boost. This amplifier was bundled with a heap of broken gear salvage operation that occurred last Spring.
Exposing the guts begins to tell a tale, a floating PCB, severed wires, power transformer replacement (and the addition of an Archer lower voltage power transformer wired in with clear jacket lamp wire to serve the needs of solid state). My guess is that if this thing had reverb to begin with they would have gotten around to finding a place for the B+ filtering and rectifier, absent as it stands.
A narrow peek at the pot mounted preamp and tone circuit, I'll probably put those carbon comps and that tropical fish to work elsewhere, this amp is on the gutting path.
Can I have another look at that lead dress? (I must have stopped to ponder this part of the amplifier at least three times)
This reminds me of my first builds. Before I digested the concept of lead dress, or was able to look at other people's work on the internet. I honestly don't see anything redeeming about this amp as stock. While there is evidence of someone else having tampered with this amp in a few ways, my gut is telling me that this wiring arrangement is stock. Obviously, by the early 1970s the notion of quality had fallen by the wayside in a few quarters. Being the sentimental sort, I typically have to do a bit of weighing out before I gut something; this, however, offered no problems on that front. Now it will be testbed to some goofy ideas,and not so goofy ones, such as making use of that dual RCA slot to build in a proper reverb.
Much better.
Sunday, October 31, 2010
Saturday, October 30, 2010
I built a shelving unit today. I'm sure this seems like a boring topic, so let me reiterate how absolutely excited I am about this. Here's a before picture of my bench, as of this afternoon:
This essentially depicts the conditions of my dedicated workshop, and for the past couple months the nearest thing to a bench I've had is the living room or laundry room floor. This must end. Of course, it entailed erecting a framework in conditions similar to what you see on the bench.
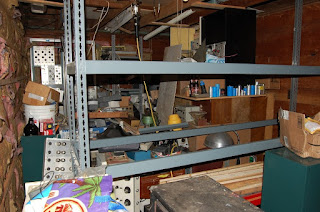
This shot reveals the sort of narrow passage I'm faced with between the workbench and what will be the actual audio laboratory. Evidenced by this picture is a heap of lost floor space. I should add that the used shelving unit I procured is 12 feet tall, in addition to being 8 feet wide and 2 deep, the 12 foot aspect pushed me up into the rafter space.
I've situated the uppermost shelf rather close to the (imaginary) ceiling plane, which will result in an out of the way staging area for miscellaneous junk and chassis that I don't want totally buried, but absolutely do want out of the way. It's almost embarrassing how much shit I have that falls into this category.
Fast and dirty prestaging. The lower space is designed to be tall enough to allow passage of my rolling racks, allowing extraction for live shows.
The bench, while far from being usable, is already looking a lot more inviting.
Friday, October 29, 2010
It would appear (at least in my convoluted install/current rung on the learning curve) that the precision capabilities of SketchUp are somewhat limited, though being able to confirm my visualizations and having drawings upon which to base further visualization is well worth the quirks. I've executed reasonably correct renderings of the actual metal and finished dimensions of the gantry framework. Omitted (in addition to all linear movement components) are the end caps that will assist in rigidity and provide for motor and screw mounting.
Homage to TRON:
I doubt I'm going to wind up rendering the entire machine in 3D, since I can't use the files for anything other than eye candy. So expect some really boring 2D CAD stuff in the future.
Speaking of eye candy, here's a gutshot of the oscillator bank in a Baldwin 45 organ. This picture amounts to being essentially gratuitous since the Baldwin 45 is really, really low on my to-do list. I do really like their approach at the voltage buss (seen at bottom) though, one of the grey area aspects to a tubed modular.
I've sort of committed myself to guts or gear pics with each post, so while I'm busy on the data entry side of things I'll continue to dig up more or less random shots from the archives. I expect some actual current electronics shots soon.
Thursday, October 28, 2010
After assigning permissions and editing the virtual registry of my simulated windows machine (in wine, so I'll name it Drunk) I've successfully launched Google SketchUp 8 in Ubuntu. The following is a screenshot of a rough (and partial) render of the plotted gantry:
I'll spend the next few coffee soaked mornings drafting dimensionally correct components and fitting them together.
I had the good fortune to play with an early 70s PAiA modular last night, it fortified some of my ideas about future builds. Mainly, the elusive aspect of personality. I aim to harness a reproducible approach that emulates aged and failing parts without the sense of impending doom.
On the guts front, here's a couple shots of my 1973 Fender Princeton (queued up for a recap).
When I bought it there was some serious anaemic distortion going on. As it turned out, the ground reference to the phase inverter had lifted. I'm hoping for some robust distortion after recap and a little tube rolling.
Tuesday, October 26, 2010
In terms of being a documentarian, I seem to be having one of those weeks in which all of my forward push is transferred directly to a wheel I'm standing within. Bit pieces for the CNC project have been trickling in, I dug through the aluminium scrap heap at Coyote Steel last Friday and procured some C channel that will comprise my gantry. Before posting about that, however, I'd like to have some sort of 3D rendering/CAD cut-sheet of my gantry to accompany what would otherwise be a dull picture of a pile of metal.
This is where I'm reminded that my passions do in fact not lie in the realm of twisting software around to my needs and flexing my digital muscles. Shame that, since I'm morally locked into the Linux philosophy, which requires that I think for myself (ie: fit together digital puzzles) once in a while. So this morning I've installed wine so I can have another go at Google Sketchup, which as I recall has a nice and soft learning curve. We'll see if my mild apprehension in getting nested software to run is warranted. Then I'll be able to bang out a proper CNC update with eye candy.
Also, on the machinist front (remind me to self apply that label only AFTER I am pulling finished work out of the mill), I picked up a Mitutoyo digital caliper over the weekend, which will help me immensely in committing the correct dimensions to the drawings I'm about to draft.
For the record, these knobs are in fact different sizes.
And, so as not to rob ourselves of the pleasure of looking at guts, here's an internal shot of a Leader Electronics Corp. LCG-388 Color Bar Pattern Generator. Hailing from the days in which a television was repairable (I'll let you do the math on that). Given the compact nature of the unit I fully expected to see some ICs in there but no.. THIS:
Discrete transistors, germanium diodes and a lot of the letter "3".
Sunday, October 24, 2010
I've been really dragging my feet about burning in the caps on the RCA oscilloscope, seeing as how they are dated late 1964 for manufacture and I'm not doing the recap, rather hoisting it off on someone else. So I've been tiptoeing around the machine a little bit, keeping my heavy hand to myself.
In pondering the guts, two things are obvious. A) this machine has been subject to an impact of sorts at one point in the past 46 years:
B) the wire which broke free was essentially under tension and I'm willing to embrace the theory that the wire gave out when the impact occurred. You can see visual signs of oil staining on the wafer at which the wire was bent. I believe such leeching is inherent in the chemistry of the plastics, which in and of itself can be considered alarming.
Sticky wires sort of comes with the territory though, I do minimize contact with them when they are in this state, typically by leaving them be. Unless they've collected organic matter on the sticky surface I've not seen first hand evidence of voltage insulation failure, so... it's filed in the leave well enough alone category.
The fix for this unit entailed simply stretching the wire, which, due to the impossibility of directly applying that concept to actual wire I ran a leg off the terminal using a lead clipped from another component.
I'm happy to report that at a little over 80% wall voltage the scope is showing trace!
The hawkeye's amongst you will notice that the horizontal is far from true, I'll adjust clamp positioning once it's up to full voltage.
Saturday, October 23, 2010
Traynor YBA3 Custom Special
This amp was in need of some attention. Caps had let loose in the power supply, spewing the contents of their guts everywhere. Depicted here is a first try at recapping, all these parts needed to go away. I also felt the need to put some proper size diodes in there, I think the pictured little blob was rated at 6 amps, my gut disagreed though (especially since SOMETHING had to have shown the bias supply filtering something that triggered that explosion)
Here's the original incarnation of the supply, complete with gunk, and wood chips. Honestly, I think the wood chips are my fault, I subjected this poor beast to some pretty sub par storage conditions while working up the gumption to dive in. The following shot is for those who don't think gunk (or saw dust) is worth the trouble to clean:
And, an after shot of sorts:
Of course, this is old news, I recapped this thing a year ago. I'm just paving a little here today, as it is visiting my bench again. See, this amp sits in the transition period between the two reasonably close schematics I can find on the web. It has become clear that my choice in reining in the bias when I processed the amp last is incorrect (or the JJ E34L are not up to the task). So my plan is to give it a more thorough going over which I will subject to this log.
Thursday, October 21, 2010
Yesterday afternoon I returned to the local electronics recycler with intent to buy an inexpensive dusty old oscilloscope for a friend who had displayed interest in it. Behold:
An old RCA WO 91B, I don't think RCA really made a huge splash in the scope market, dominated as it was by Tektronix, HP and so forth; still this feels as if it has a bit more capability than an EICO or Heathkit of the same era.. but I realize that may just be the conclusion I draw after being hypnotized by the RCA meatball.
Scanning of the guts revealed no erupting capacitors, though, if this thing works it'll be a good preventative maintenance maneuver to replace all those paper bound caps. I love it when stuff is easy to spot and access.
I did spot one hanging wire in the horizontal refresh range that could have rendered this unit inoperable
It appears to have been connected to this lug:
So I'll solder it there prior to the application of electricity, what's the worst that could happen?
The lug itself slightly puzzles me, it looks like a section of solder has reflowed and has what could be an arc crater at the right edge. This could be visual artifacts from the photography, I'll give it a closer look when I'm in there. My current theory is that a resistive joint may have been heating up and the thermal cycling triggered a fatigue failure at the wire, which could have arced on its way out. Which, in my mind points to a tube failure, as that sort of current probably shouldn't be occurring at a ground reference for an oscillator to begin with.
An old RCA WO 91B, I don't think RCA really made a huge splash in the scope market, dominated as it was by Tektronix, HP and so forth; still this feels as if it has a bit more capability than an EICO or Heathkit of the same era.. but I realize that may just be the conclusion I draw after being hypnotized by the RCA meatball.
I love this logo.
Scanning of the guts revealed no erupting capacitors, though, if this thing works it'll be a good preventative maintenance maneuver to replace all those paper bound caps. I love it when stuff is easy to spot and access.
I did spot one hanging wire in the horizontal refresh range that could have rendered this unit inoperable
It appears to have been connected to this lug:
So I'll solder it there prior to the application of electricity, what's the worst that could happen?
The lug itself slightly puzzles me, it looks like a section of solder has reflowed and has what could be an arc crater at the right edge. This could be visual artifacts from the photography, I'll give it a closer look when I'm in there. My current theory is that a resistive joint may have been heating up and the thermal cycling triggered a fatigue failure at the wire, which could have arced on its way out. Which, in my mind points to a tube failure, as that sort of current probably shouldn't be occurring at a ground reference for an oscillator to begin with.
Wednesday, October 20, 2010
Can I make a joke along the lines of: if it's Federal, it's probably not good for you? I guess I just did. On that note, did you know that the archaic form of the word federal is foederal? I suppose that label was deemed a bit too transparent (cue laugh track). But, I digress, I'm not interested in talking about commonly accepted popularity contests or congregations of self important assbags, I'm more interested in rectifiers at the moment.
Here's a close-up of the selenium sandwich stack in a Navy ME-6D/U electronic multimeter (which will likely be covered in a future installation). Ease of identification is selenium's greatest attribute, it can typically be spotted in well under a minute of having cracked the case. The component pictured above is a less common version without the oversize heatsink fins. My philosophy is to change selenium out when I see it. You can read about the failure modes elsewhere on the net, here's a fine write-up: http://yarchive.net/electr/selenium_rectifiers.html. This is the rectifier block in schematic:
And, extrapolating from that, the electrical orientation of diodes in the stack:
In terms of out with the old and in with the new, this cannot be easier to wire; the main concern is going to be introducing some sort of framework that will avoid a free form rat's nest sculpture that's rectifying the B+ voltage (I'll be sure and photograph this section when I post an update on this unit).
In terms of electrical characteristics, selenium and silicon are not identical, and depending on the installation, a low value high wattage resistor might be beneficial in terms of nudging your B+ down a bit. Also keep in mind that average wall voltage has crept up over the past 50 years (I think evidence of selenium in the power supply typically dates the unit to that age at least) so the combination of higher AC mains and reduced internal resistance at the power supply might place undue stress on the circuit. A bucking transformer at the power cord is generally a good idea (even with tube recitification). http://www.philcoradio.com/phpBB2/viewtopic.php?f=11&t=2247
Regarding the selenium pull jobs, I have the sick notion of dropping them into ring modulators. Owing to the greater forward voltage drop (read as lower efficiency) I expect I'll need to build boosters on all three legs of the circuit. We'll see what shakes loose on that front.
Tuesday, October 19, 2010
Barring actually getting anything done, let's have a look at the pile and see what relics are situated toward the top. Of course, current placement in the upper strata means nothing in the big scheme of things. Once I do something stupid like lose a tool the orientation of stuff tends to be disrupted.
PACO E-200-C
I've been meaning to dive into an RF test generator for a while now, and it looks like the Precision Apparatus CO E-200-C is going to be my test bed. The goal, of course, is to squeak out something usable in the framework of audio while avoiding extensive modification. Of course, before I begin down that path, the unit must be gone through. Note the omission of a power switch..
..and, once this "fused" plug is severed and forever dropped into the odd parts bin, the omission of a fuse. I'm also not brimming with excitement regarding the circuit they've built to clean the hash out of the AC mains:
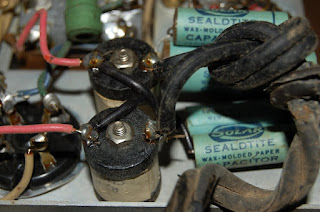
Why yes, those SEALDTITE caps DO tie to chassis ground.
Though I am gratified that this capacitor isn't sweating nitroglycerine, I'll wager what it is sweating is less than swell.
Obviously ready for retirement. I trust the rabid preservationists out there will forgive me my inability to source* replacement paper caps with cloth covered wire, I'll probably reuse that clamp though. (* or having sourced, the inability to justify the cloth wire premium) It would be cool though to drop another stick of dynamite into it, but since the enclosure is without peep slots I'll be happy with some new production shiny capacitor instead.
The OSC circuit itself is a thing of beauty, somewhat self contained on the rotary range selection bank. It's pretty much this section that convinced me to leave the fundamental circuit intact and attempt to implement the device at the frequencies it was built for. Simply put, I really don't want to hack any parts into this section, seeing as how it's a fine example of the quality of build that was more or less commonplace prior to the methodical erosion of quality ushered in by greed during the waning years of the 20th Century.
Sunday, October 17, 2010
IT LIVES!
After hacking away at this thing FAR MORE than I had intended to, the diode test fixture works, again. Having displaced the guts enough to tackle some metalwork, I bored out the power supply connector hole to accept a DB-9 connector that will support all power feeds, though I've retained the banana connectors for the variable supply for convenience.
After plumbing that in, I applied power only to learn that I'd lost a channel. Following a bit of hair pulling (from the front, naturally), I isolated a poor solder joint on one of the three breadboards. Closed it up and discovered that while I'd fixed the channel I was working on another channel took a shit. Traced that to the same board, repaired it.. gently tucked everything away and closed the lid. You'll just have to live without gutshot of the most current incarnation, sorry. Imagine a lot of wires that have been cut and spliced numerous times and three ugly breadboards.
Here's a couple face shots:
These numbers are meaningless in terms of absolute voltage. I have traded accuracy for precision. Here is a shot that demonstrates the sort of swing one gets from a change in temperature, my finger throwing off the readings of channel D (it took about 20-30 seconds to drop that far and it hadn't finished dropping).
That is why all matching of semiconductors takes so long, one must allow the part to thermally stabilise or any readings are essentially useless.
Saturday, October 16, 2010
CNC Build, part one.
So, in order to be able to make two sided PCBs, cut face panels/enclosures and basically be able to reproduce multiple units of various things, it has been decided I need a CNC mill. I've been buying bits and pieces for going on a year now, and today I hauled home this old metal cabinet that will perform the duties of foundation to the machine:
I've laid my linear bearings out in a sort of imaginary mock-up, the gantry pair (horizontal in the pic) are pictured laying back and will actually be situated so as to support a vertical Z axis (the shortest of the lot). I'm planning on housing one of my huge 24 volt power supplies inside the case, greatly reducing tip over factor. Here's the fast and dirty low down of the planned build:
Phase 1) Work area 18x18x6 inches, moving gantry design. Linux EMC2 controlled.
Phase 2) Fabricate superior framework.
Phase 3) Vacuum table
Phase 4) Computer controlled variable speed control for the AC motor
We'll see how far down that list I get, I'm just happy to finally be able to photograph something besides to contents of boxes for this!
Friday, October 15, 2010
ILLUMINATION!
I've got a soft spot for metal industrial looking lamps, this has fostered the illusion (amidst certain gift givers) that I like ugly lamps; and while I certainly won't dispute that their take on ugly is remarkably interesting the entire thing was founded on the fact that I get rabidly happy when I find some beat to shit industrial looking lamp. Like these:
While true, these are anything but beat to shit you can spot the rust. They've been doing what they do for a long while, and they do it really well. So now my bench is substantially brighter, now to find a better home for the 230 pounds of power supply that are in my way:
Thursday, October 14, 2010
Sporadic updates, I'll try to be a better archivist.. it won't be difficult.
Things are looking good for my diode test rig, only 1.5 years in the making. To recap, it's a comparative machine that tests four at once. I was having a hell of a time calibrating it (across 4 parallel voltage dividing resistances) so I added a bank of MOSFET transistors to decouple each branch from the power supply, and eliminate the pesky crosstalk from wreaking havoc on my calibration process. But, before I go into that, here's photo-documentation of the earliest revisions:
In the event it hasn't occured to you by looking at that pic, this phase was a HUGE pain in the ass to calibrate. It entailed flipping the lid (which required mental inversion of position, since everything you see there is actually mounted to the lid) and gingerly turning the screwdriver slotted into a pot that is suspended by wires. Simply locating the correct pot for display and range was bad enough, but this mock-up proved the theory enough to pave the way to revision 2:
This was a huge step forward, all calibration being routed into the base of the unit allowing for adjustments with the test fixture closed and operating. Now, being able to physically engage in the act of calibration, I could come to the conclusion that from an electrical standpoint calibration was impossible.
In a nutshell, here's what's going on: An external variable voltage is fed through 4 identical load resistances which in turn each feed a diode in a conductive position; from the legs of the DUT is a three tier resistance ladder comprised of precision metal film resistors and trimpots (my basis of calibration) for each step, a millivolt meter is fed from taps along this ladder.
My theory is that the variable internal resistance of the diodes under test was large enough to throw the four parallel loads out of balance, making calibration impossible. So, the easiest (attempt at a) fix I could come up with was to slap some buffers on the variable voltage feed and hope to eliminate or at least reduce to an immeasurable level any cross talk between the test channels.
My first attempt at this was during a beer fuelled ElectronFeed meet, in which I electrically placed the MOSFET buffers feeding the DUT directly, on the wrong side of the load. This resulted in my polarity protection 1N4001 on the 12 volt meter feed acting as a fuse.
After sorting that out the meters wouldn't hold a steady measurement. Fearing them cooked, I disentangled one from the device, only to discover it worked fine. So now, with the inclusion of the buffers in a logical manner my metering has gone to shit. I'm a rat's whisker from gutting the entire thing and starting fresh when on a whim I disconnect the meter supply from common ground. Worked like a charm. So now, since I haven't any DC to DC converters laying about, I'll dedicate three power supplies to this thing. The variable bench supply (now only a reference thanks to the buffers), a 12 volt supply for the buffers sharing ground with the variable, and a 12 volt floating supply for the meters.
This weekend I hope to plunge a larger hole in the case to support the multipin PSU buss so I can escape the web of supply wires in order to... begin calibration.
All in the name of ring modulation.
Subscribe to:
Posts (Atom)